Link Management
Link Management is a feature that allows stores to set up and manage connections between the Mini App and sales management systems or third-party services. Through linking, data about products, orders, and customers is automatically synchronized between platforms, helping to minimize manual operations and reduce errors from duplicate data entry.
This feature plays an important role in optimizing operational workflows, supporting centralized store management, and ensuring data consistency across the entire system.
Supported Platforms and Services
The system currently supports integration with many popular sales management platforms and services, including:
- Sales Management Platforms: KiotViet, Sapo, Haravan, Nhanh.vn, Pancake POS, Getfly CRM, Misa Eshop, Odoo
Benefits of Setting Up Integrations
- Real-time synchronization of product, order, and customer data
- Minimize manual data entry operations
- Increase data accuracy and consistency
- Support centralized management on the Admin Dashboard
- Enhance operational efficiency and customer experience
- Save time and resources for the store
- Optimize sales and customer care processes
- Support business expansion through multi-platform integration
Each integration platform may require its own authentication information (API key, token, or admin account). Please ensure this information is accurate before activating the integration.
Integration Setup Guide
Linking with Sales Management Platforms
1. Linking with Nhanh.vn
To set up a link with Nhanh.vn, users need to have a Nhanh.vn account with Director permission. Only accounts with this permission can perform connections and integrations with external systems.
- Have a valid Nhanh.vn account - Account must have Director permission - Ensure the login email or phone number is still active
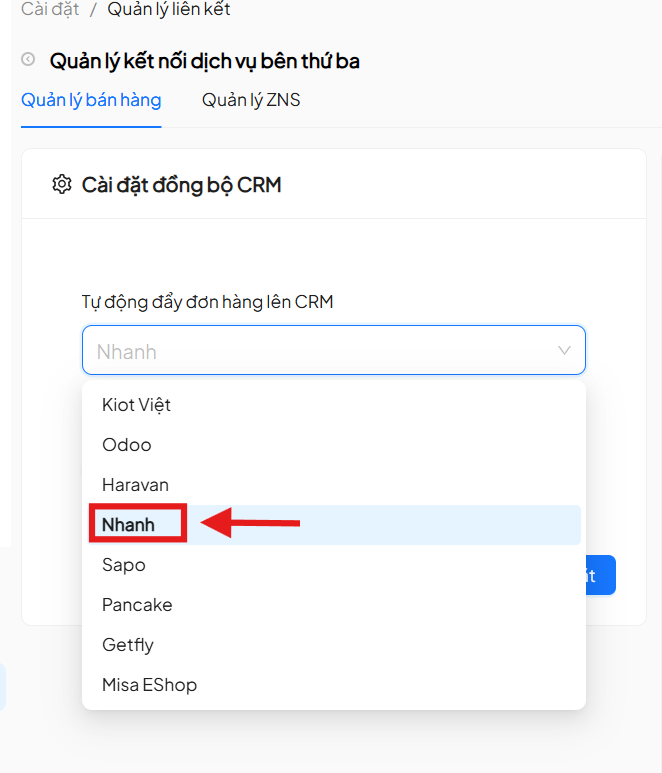
Step 1: Select Integration Channel
On the Link Management page, select the integration channel as Nhanh to begin the configuration process.
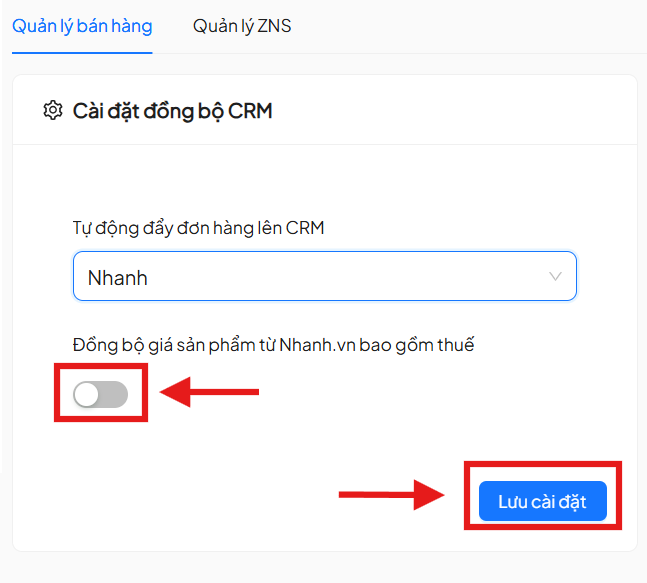
Step 2: Configure Tax Synchronization
Enable the Tax Synchronization option (if needed), then click Save Settings to record the initial configuration.
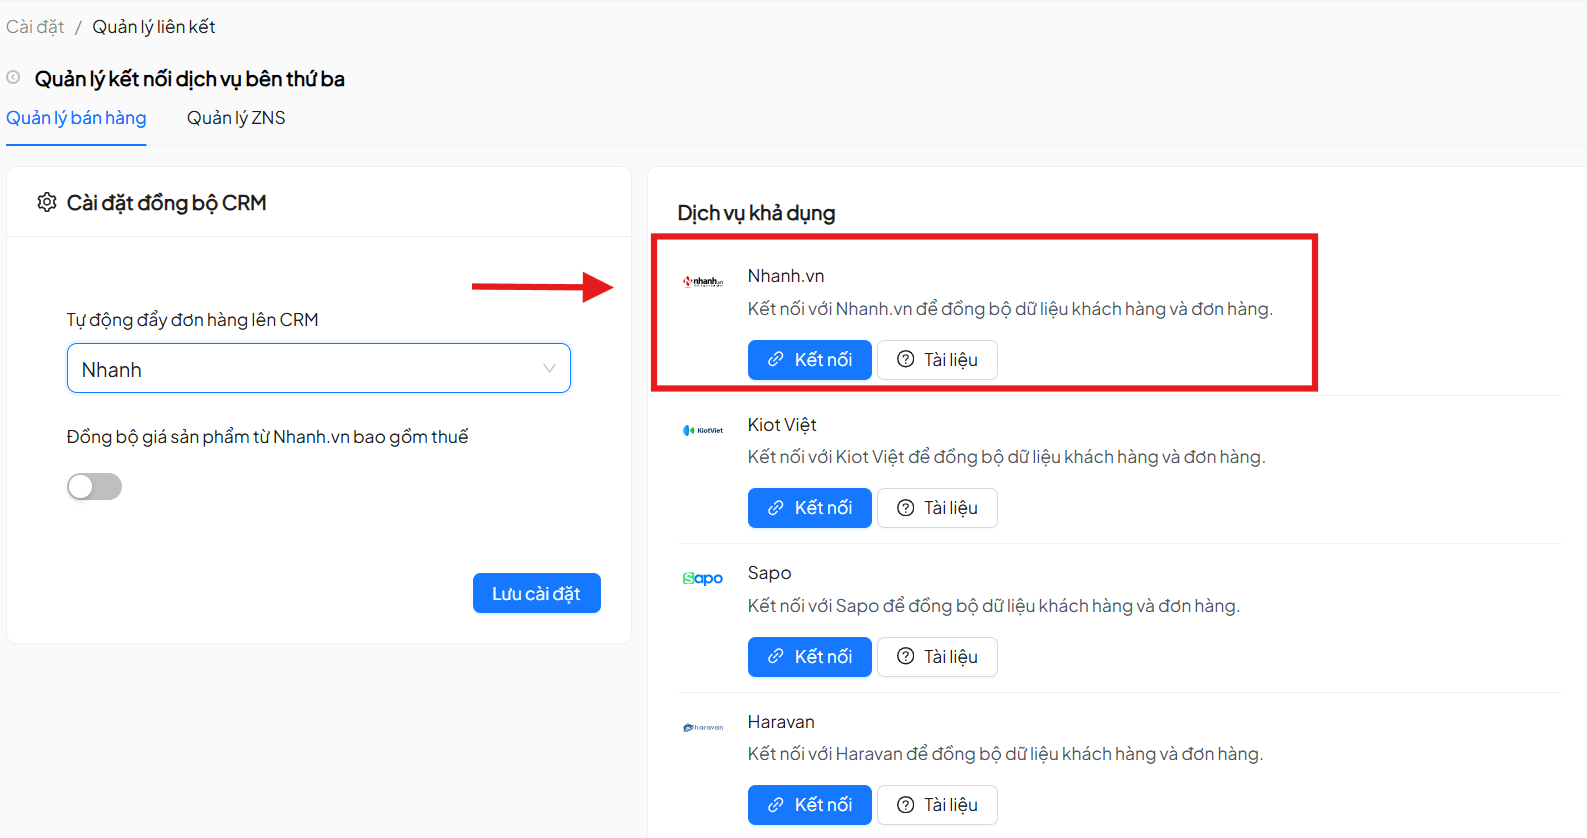
Step 3: Select Available Service
In the Available Services section, select Connect with Nhanh.vn to continue.
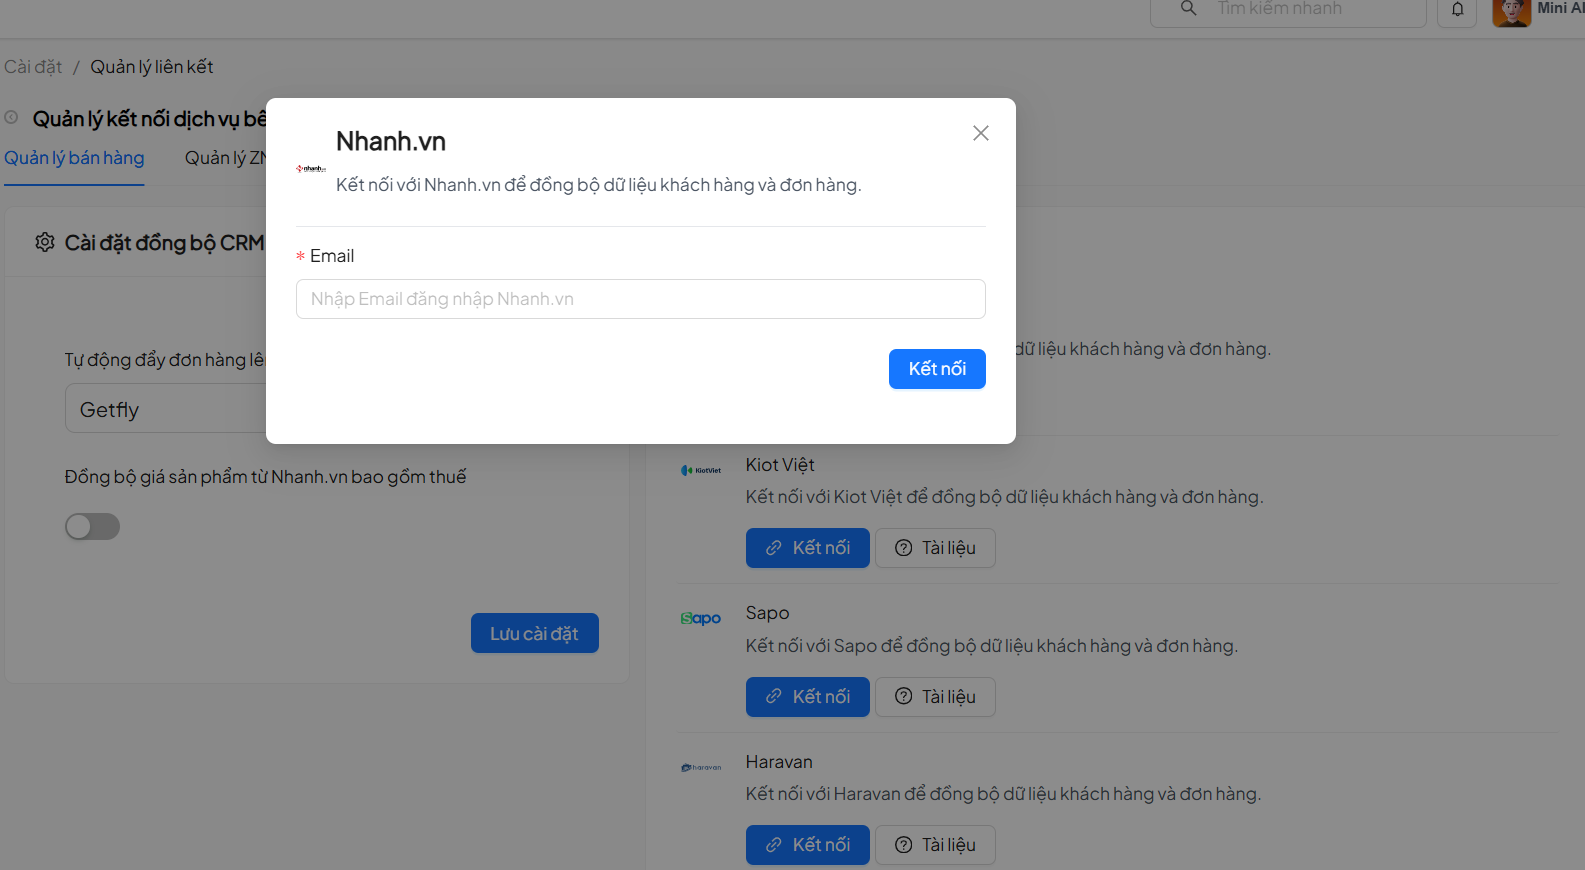
Step 4: Authenticate Nhanh.vn Account
Enter the email or phone number of the Nhanh.vn account with Director permission to proceed with authentication. If the information is valid, the system will automatically redirect to the Nhanh.vn connection page. Here, follow the instructions from Nhanh.vn to complete the connection.
Step 6: Synchronize Data
After a successful connection, users can select the data to synchronize, including:
- Orders
- Products Click on each corresponding item to begin the data synchronization process.
If no longer needed, users can disconnect from Nhanh.vn at any time. Disconnecting will stop all data synchronization between the two systems.

Disconnecting does not delete previously synchronized data, but new changes from Nhanh.vn will no longer be updated.
2. Linking with KiotViet
To set up a link with KiotViet, users need to have a valid KiotViet account. The system requires users to provide complete API connection information issued by KiotViet to synchronize data between the two platforms.
- Have a valid KiotViet account
- Have access to the Settings section on KiotViet
- Have activated the API Connection feature on KiotViet
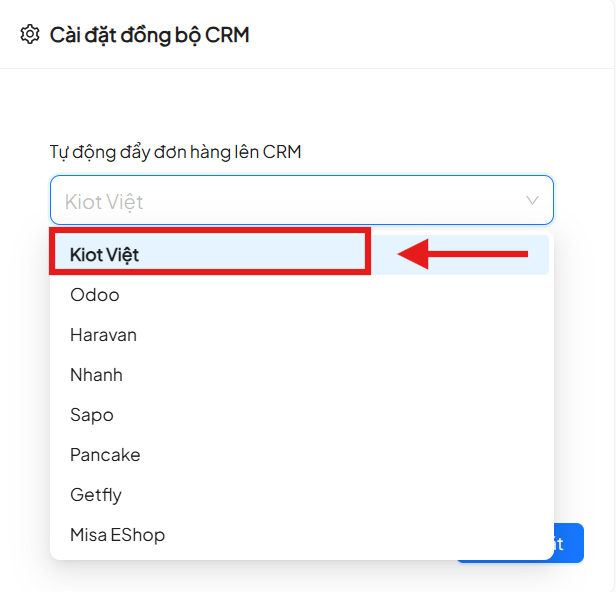
Step 1: Select Integration Channel
On the Link Management page, select the integration channel as KiotViet to begin the configuration process.
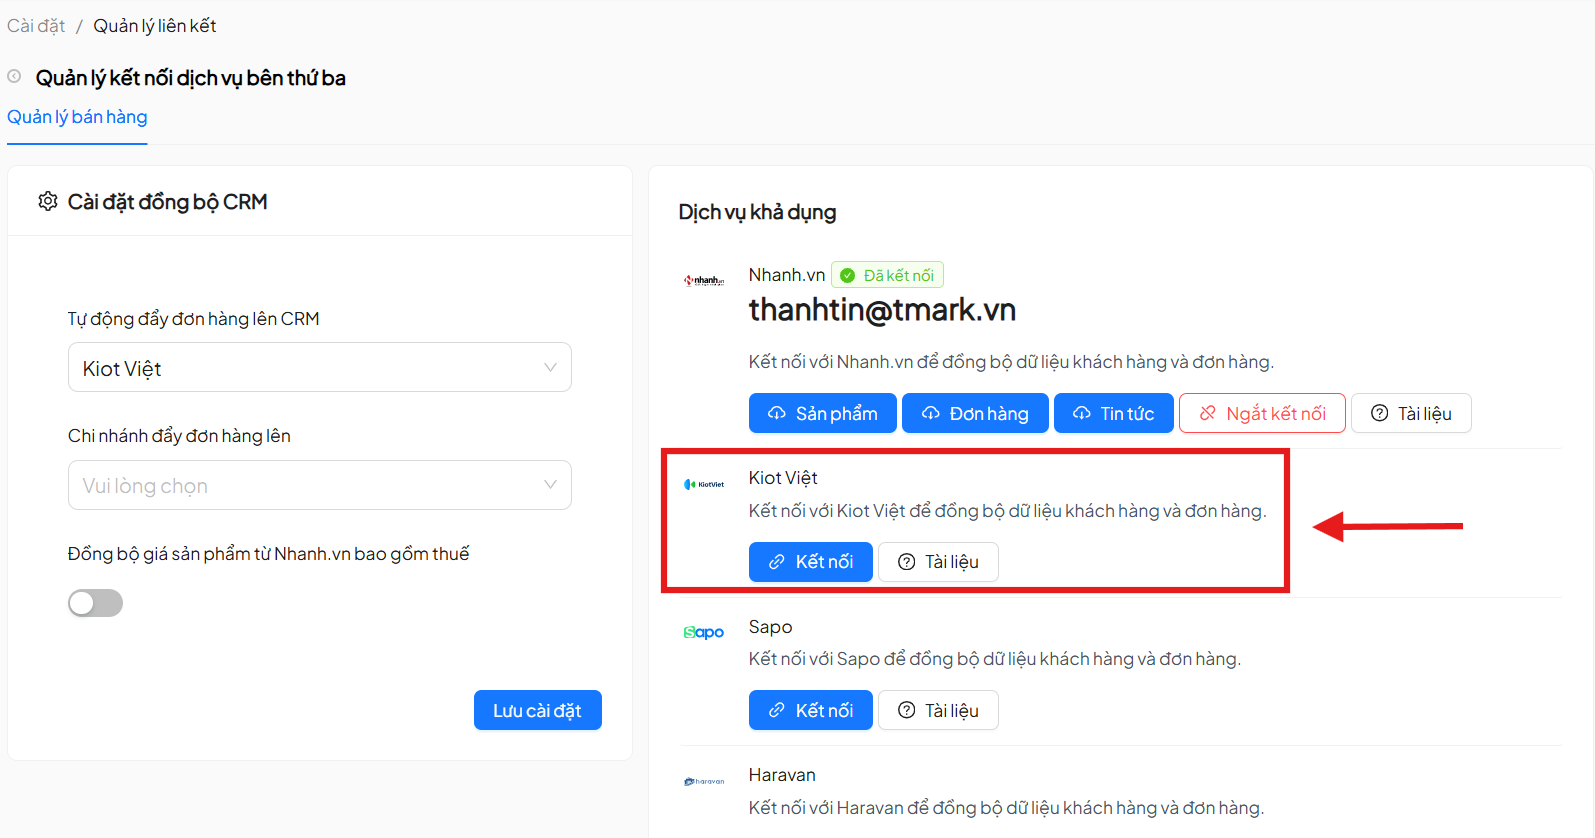
Step 2: Select Available Service
In the Available Services section, select Connect with KiotViet to continue the integration setup.
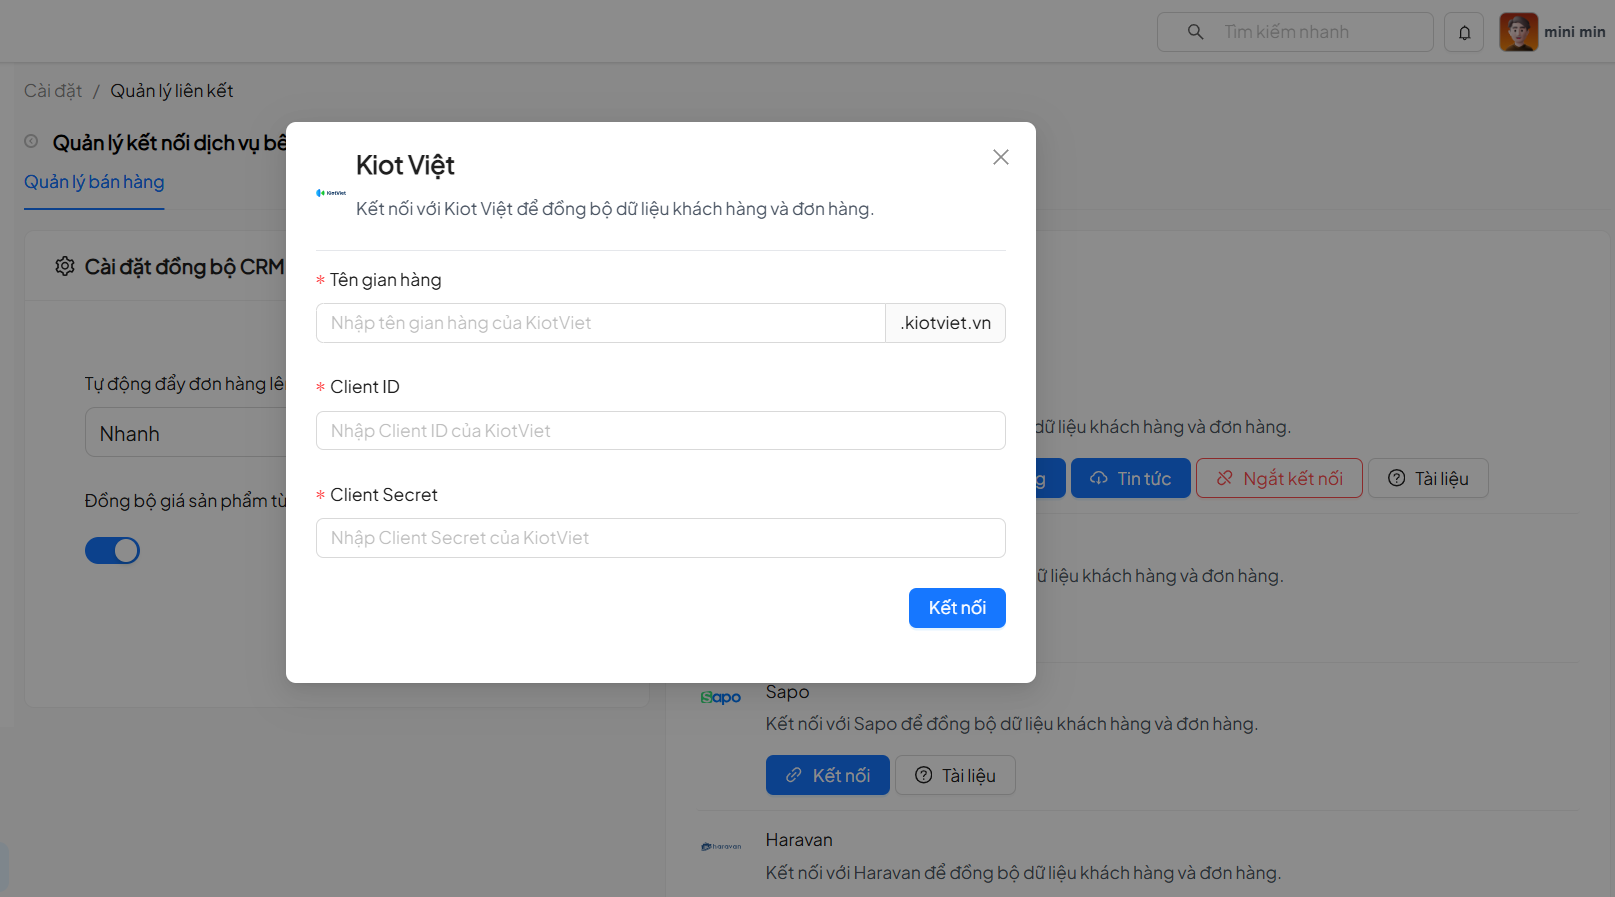
Step 3: Enter API Connection Information
Users need to fill in the following information:
- Store Name
- Client ID
- Secret Key
The Client ID and Secret Key are obtained from the KiotViet system by:
- Accessing the KiotViet management page
- Going to Settings → View All Settings
- On the sidebar, scroll down and select API Connection
After entering all information, click Connect to proceed with authentication.
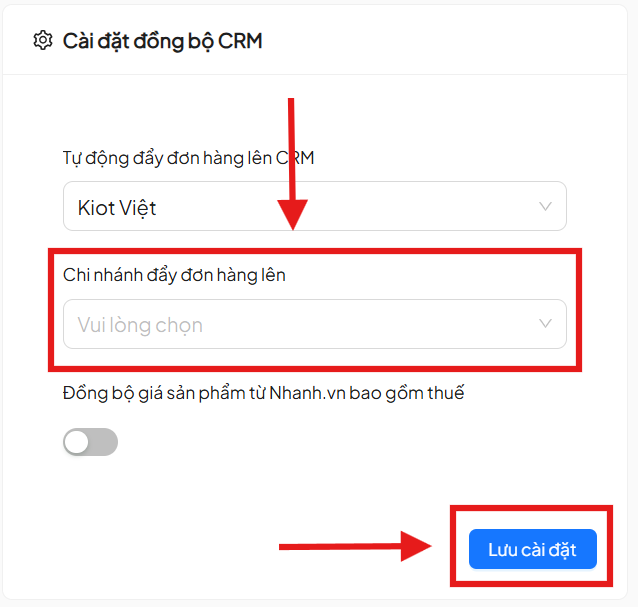
Step 5: Select Branch to Connect
If the KiotViet account has multiple branches, users need to select the branch to connect from the dropdown list. Then, click Save Settings to complete the connection process.
Step 6: Synchronize Data
After a successful connection, users can select the data to synchronize from KiotViet, including:
- Orders
- Products
Click on each corresponding item to begin the data synchronization process.
If no longer needed, users can disconnect from KiotViet at any time. Disconnecting will stop all data synchronization between the two systems.

Disconnecting does not delete previously synchronized data. However, new data generated from KiotViet will no longer be updated after disconnection.
3. Linking with Sapo
To set up a link with Sapo, users need to have a valid Sapo account. The system requires users to provide complete API connection information issued by Sapo to synchronize data between the two platforms.
- Have a valid Sapo account
- Have permission to create and manage Applications (API) on Sapo
- Have reviewed the permission documentation and integration guide attached within the feature
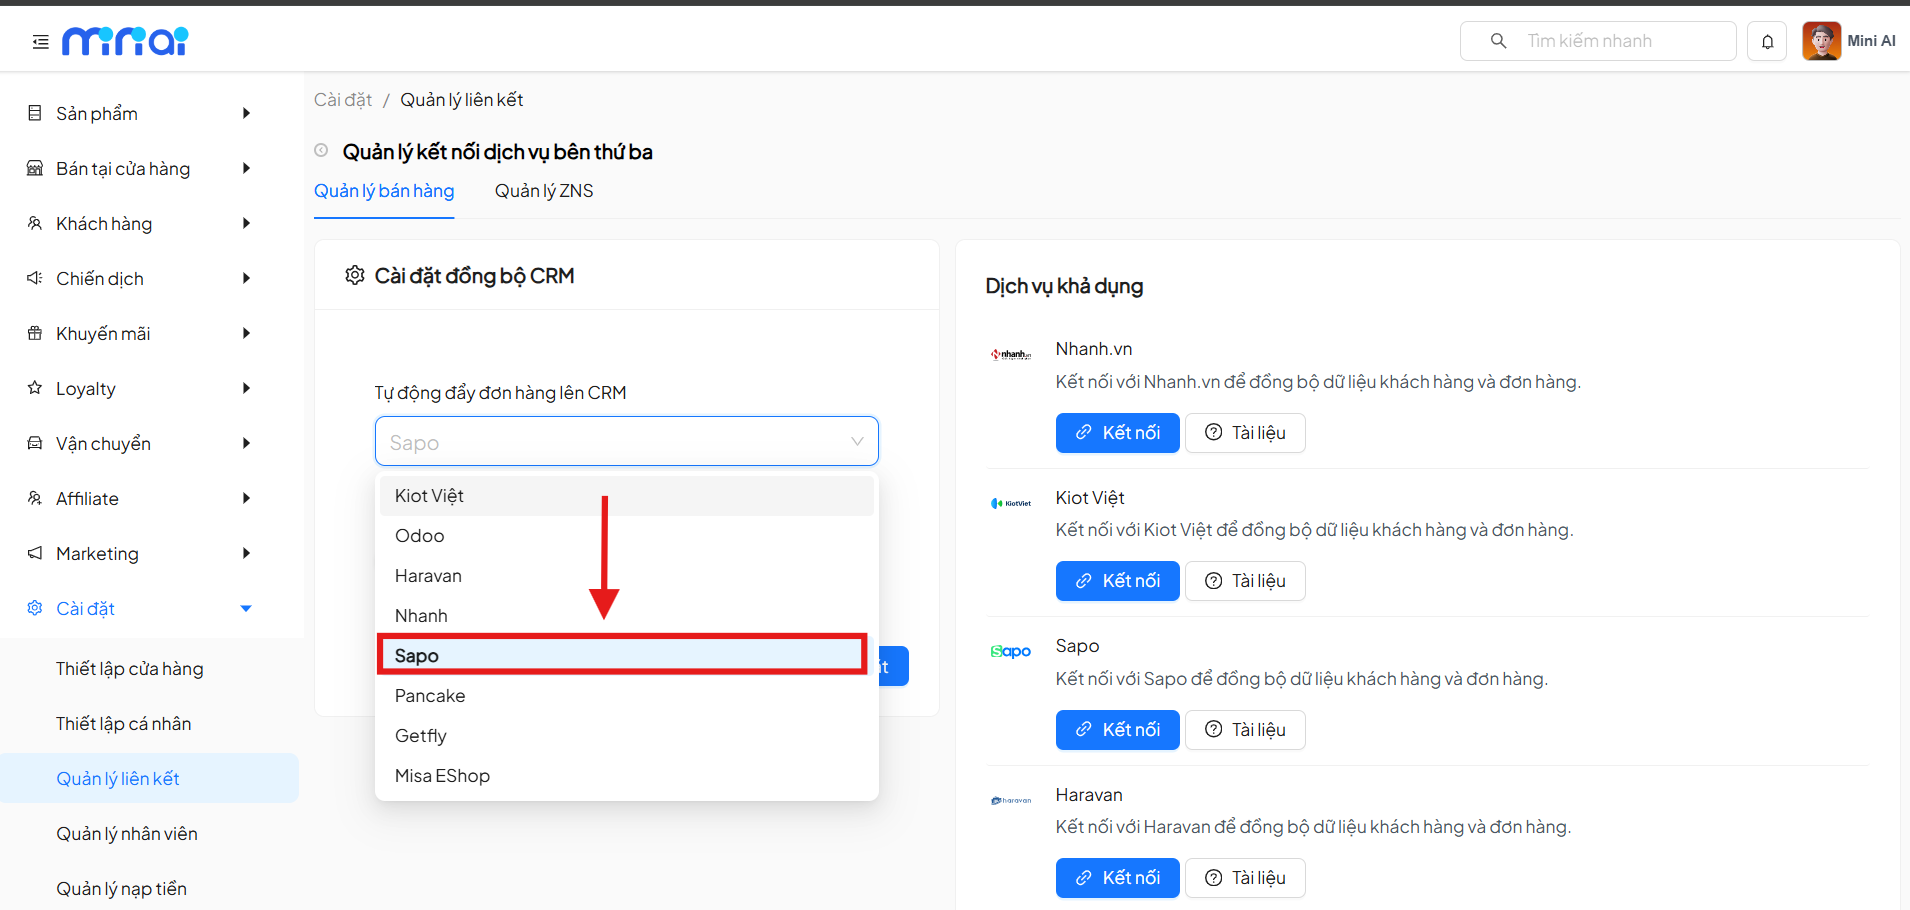
Step 1: Select Integration Channel
On the Link Management page, select the integration channel as Sapo to begin the configuration process.
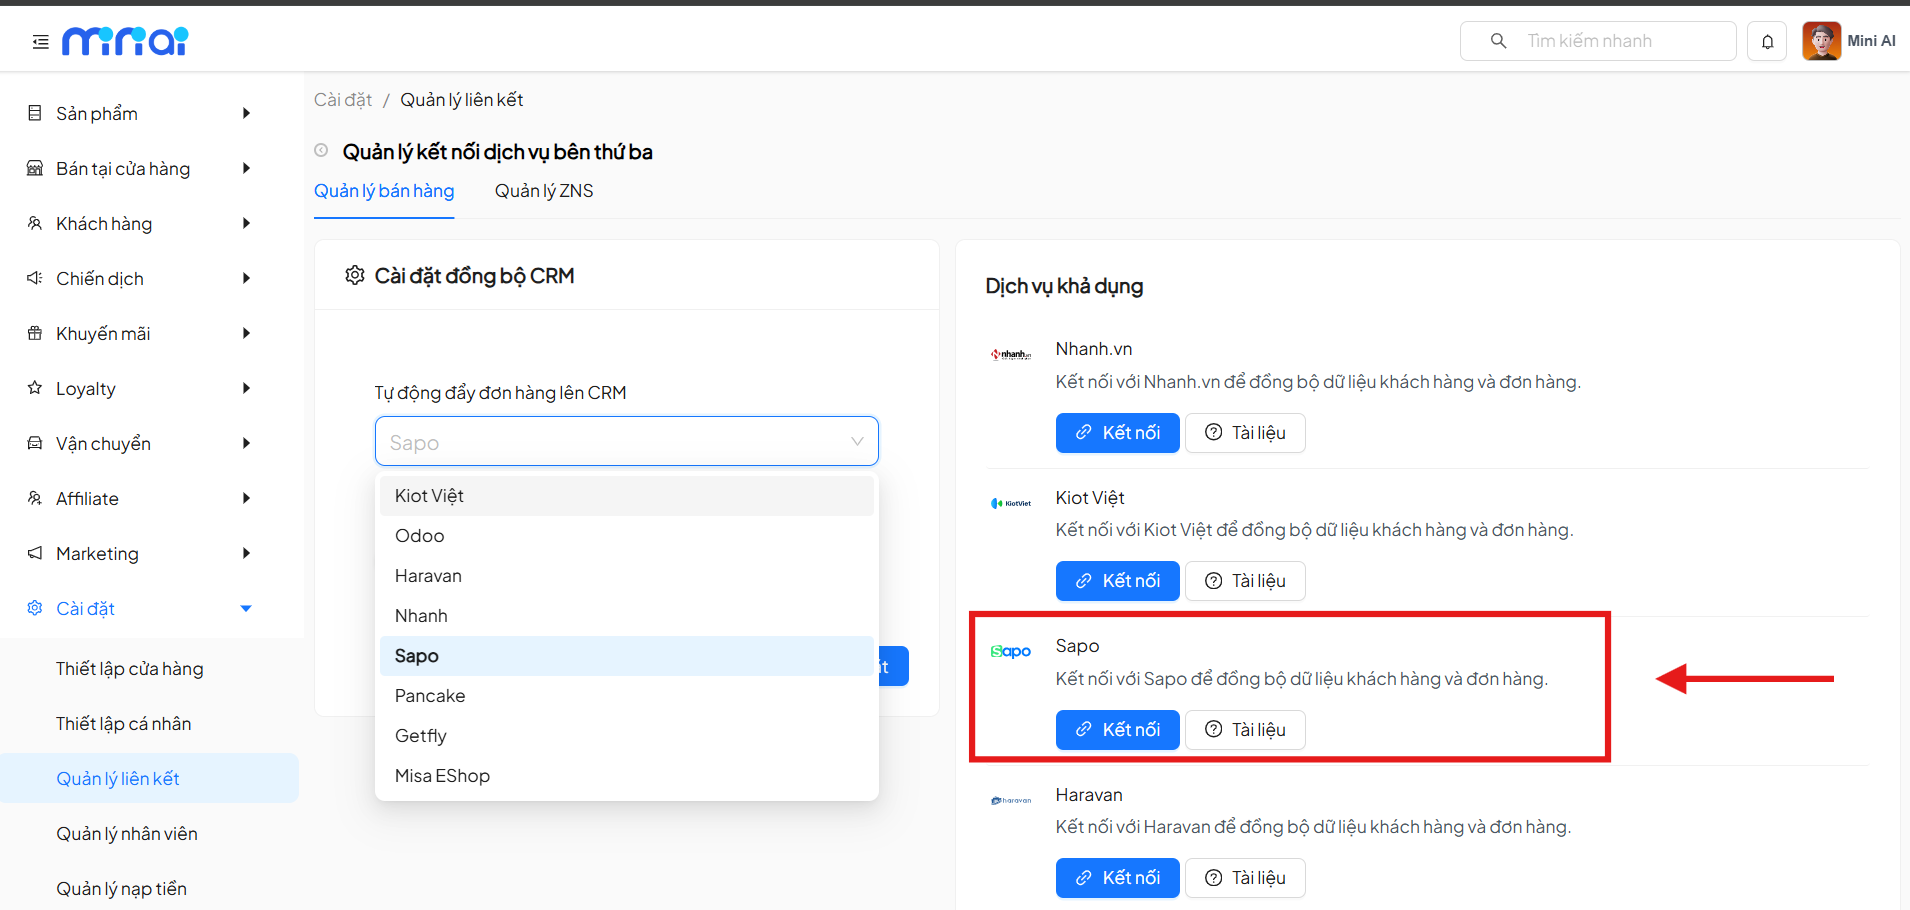
Step 2: Select Available Service
In the Available Services section, select Connect with Sapo to continue the integration setup.
Step 3: Create Application and Get API Information from Sapo
Users need to create a separate application on the Sapo system to get API connection information.
Steps:
- Log in to the Sapo system
- Go to Applications �→ Application Management
- Click Create Application
- Grant the following permissions (required):
- Products: Read / Write
- Orders: Read / Write
- Customers: Read / Write
- Click Create Application
After successful creation, the system will provide:
- API Key
- API Secret
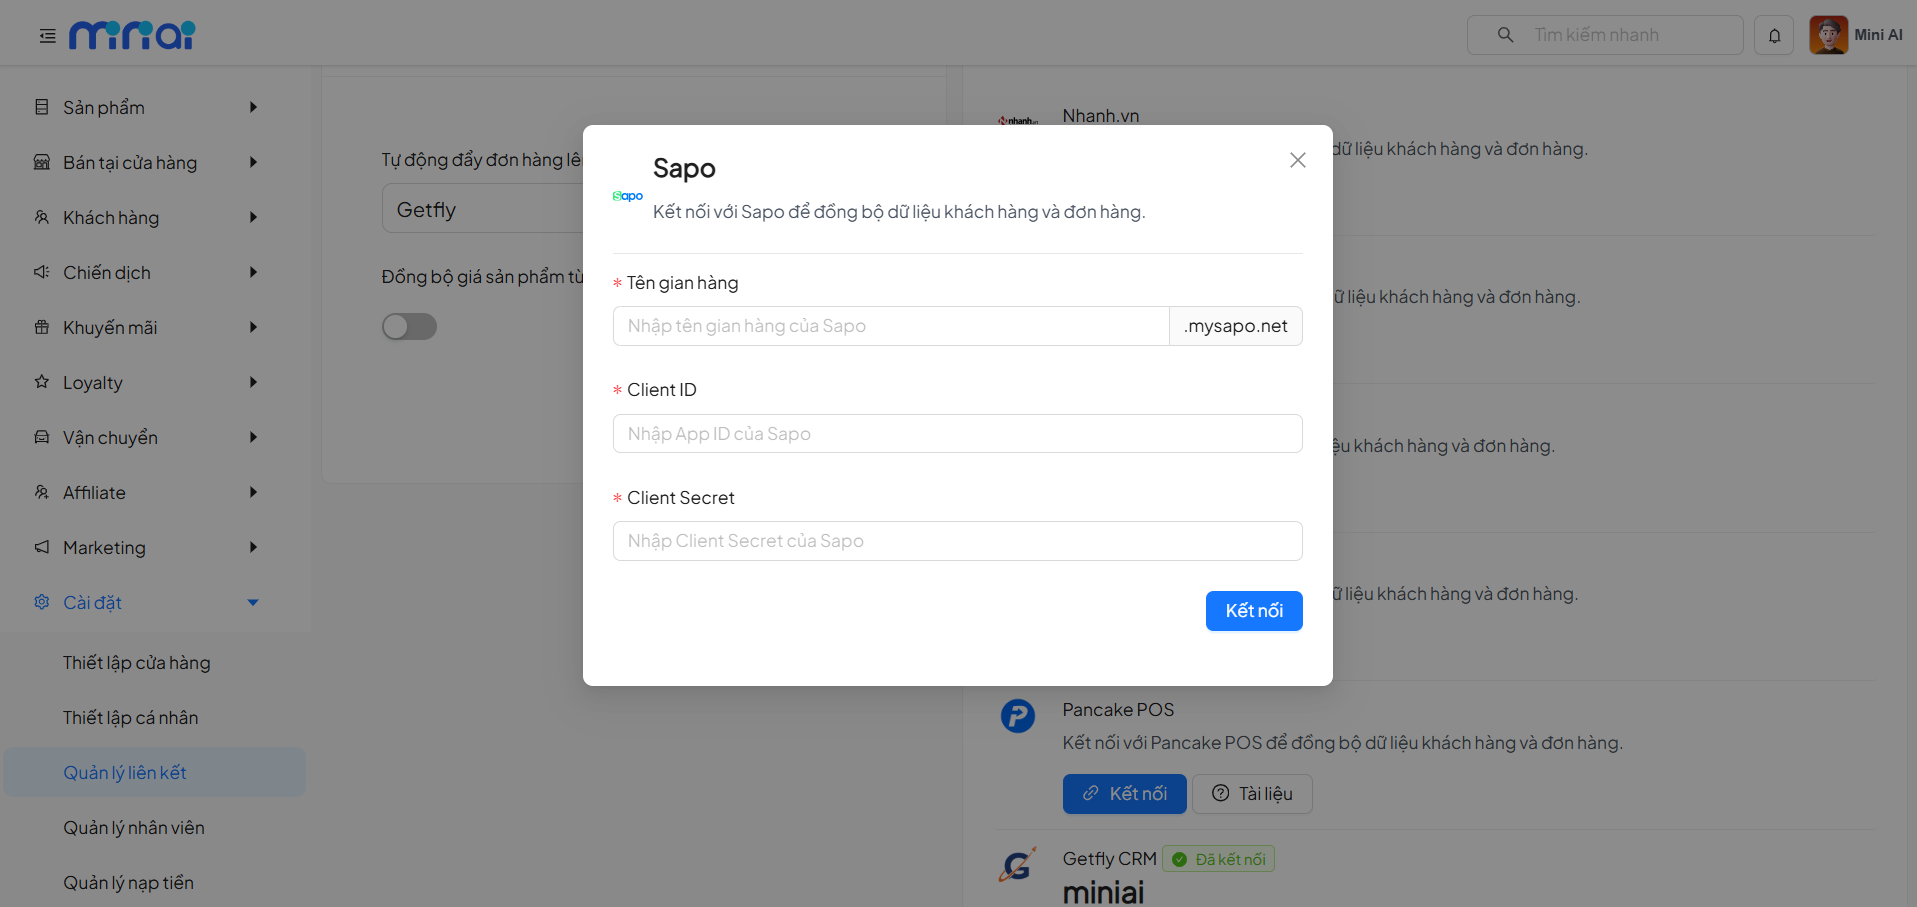
Step 4: Enter Connection Information and Link
On the Sapo connection screen, users need to fill in the following information:
- Store Name
- API Key
- API Secret
After completing, click Link for the system to authenticate and establish the connection.
Step 5: Synchronize Data
After a successful connection, users can select the data to synchronize from Sapo, including:
- Orders
- Products
Click on each corresponding item to begin the data synchronization process.
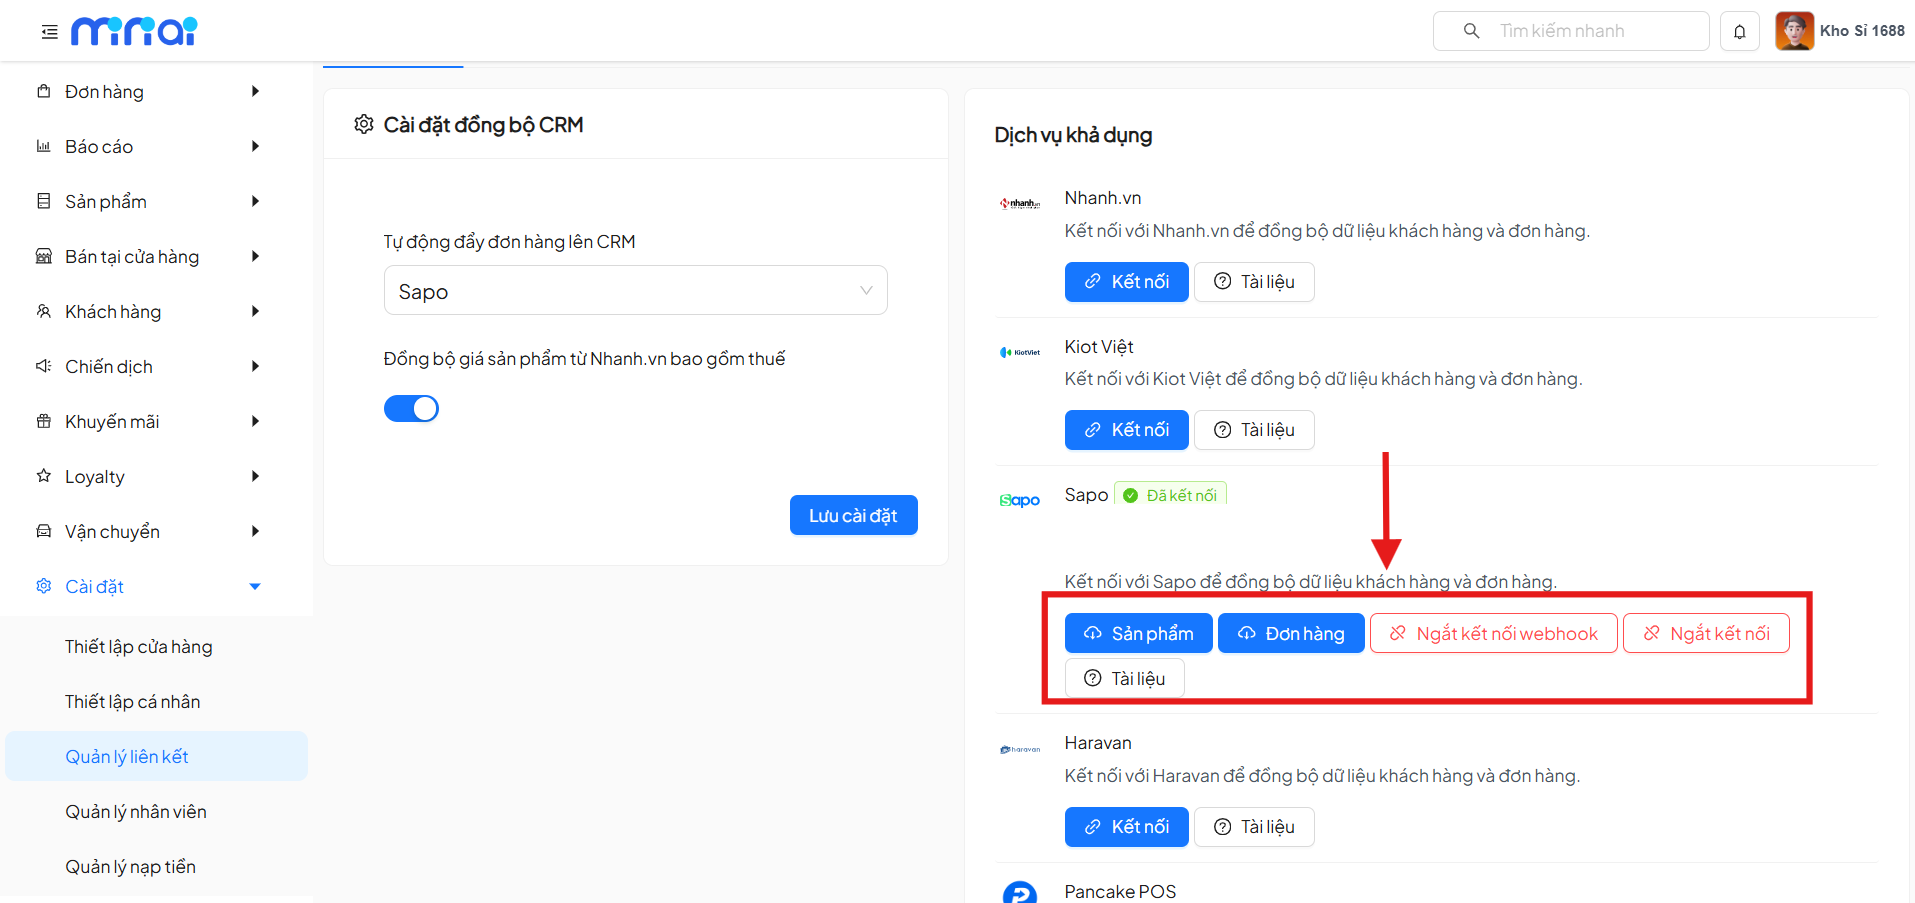
If no longer needed, users can disconnect from Sapo at any time. Disconnecting will stop all data synchronization between the two systems.
Disconnecting does not delete previously synchronized data. However, new data generated from Sapo will no longer be updated after disconnection.
4. Linking with Haravan
The Haravan integration feature allows the system to automatically synchronize customer, order, and product data from Haravan to the sales management platform, helping businesses manage centrally, reduce manual operations, and minimize data errors.
Before performing the integration, users need to ensure:
- Have an active Haravan account
- Have access to application management (App) on Haravan
- Have read the permission documentation and integration guide (attached directly within the feature)
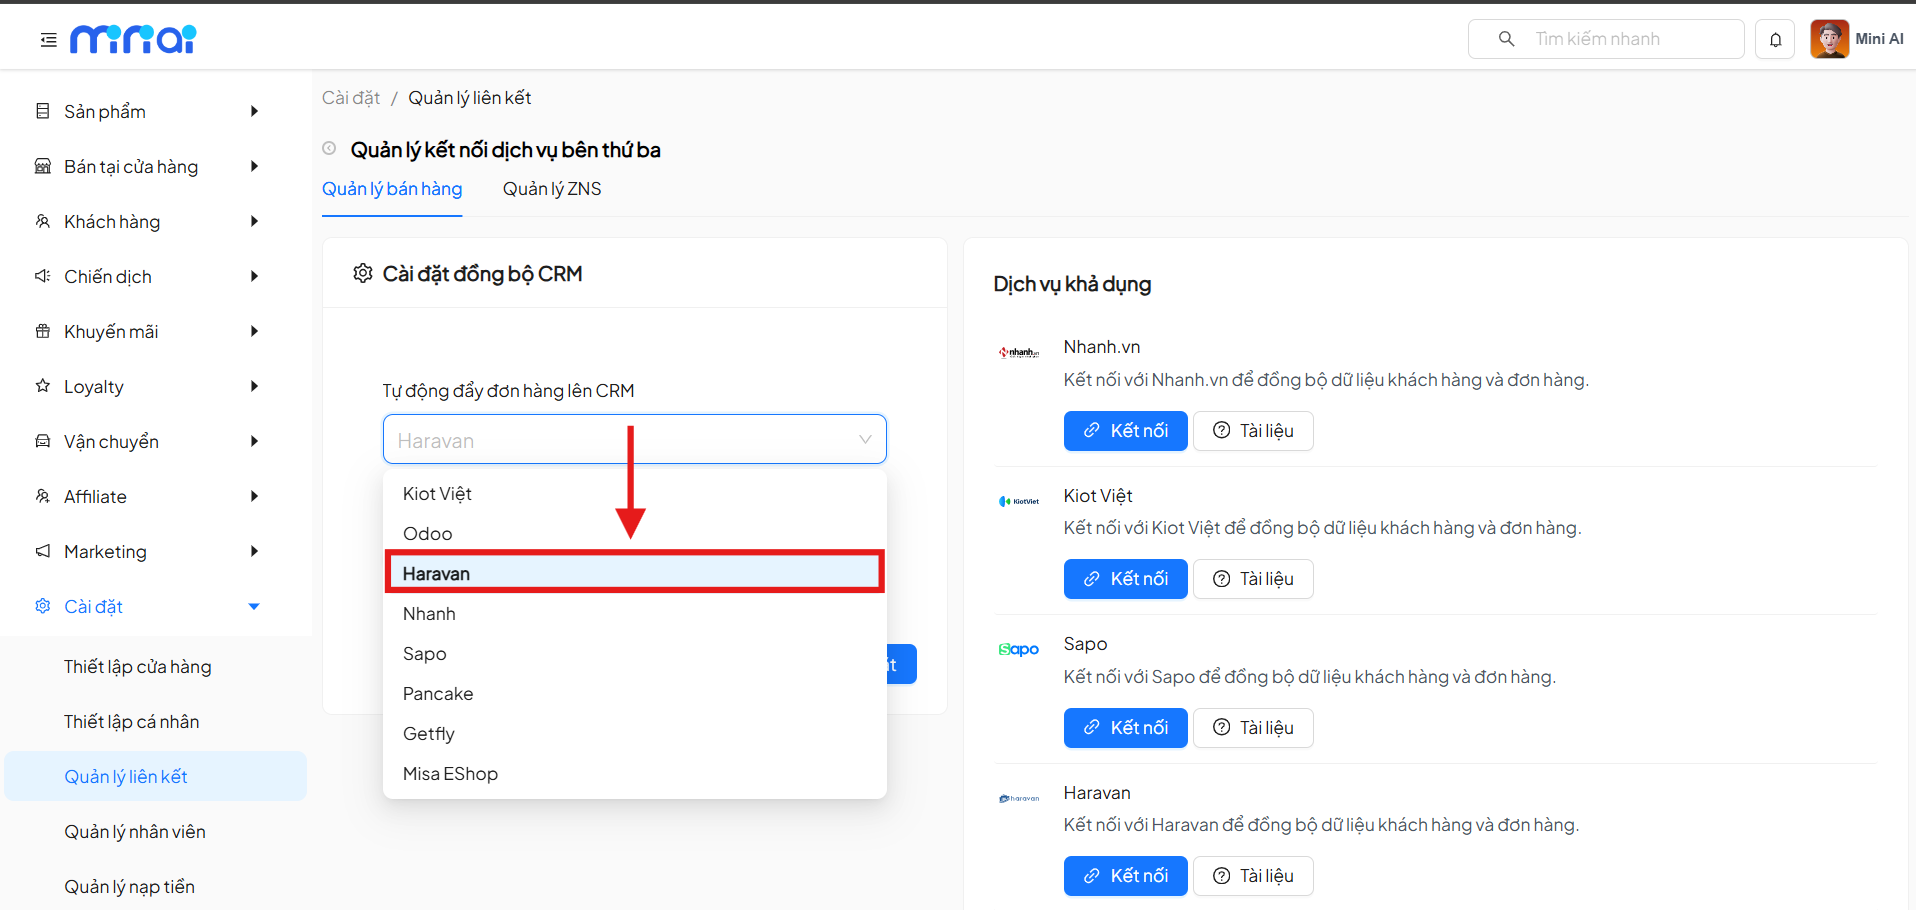
Step 1: Select Integration Channel
On the Link Management page, select the integration channel as Haravan to begin the configuration process.
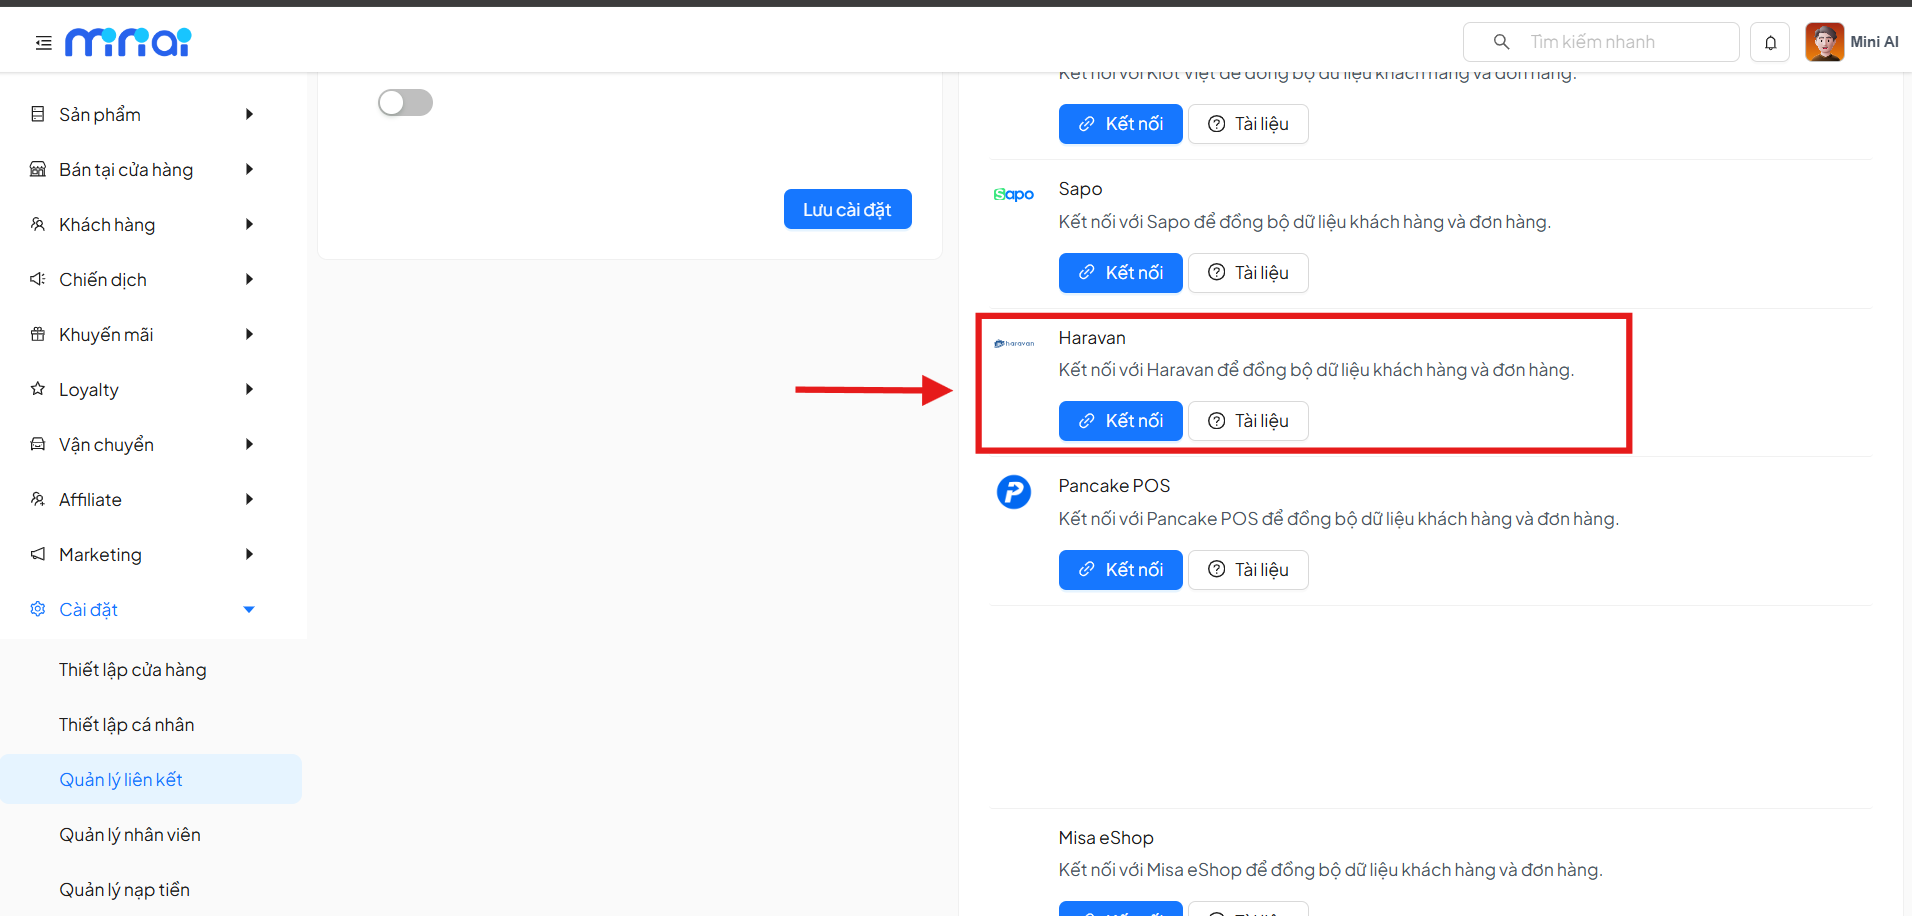
Step 2: Select Available Service
In the Available Services section, select Connect with Haravan to continue the integration setup.
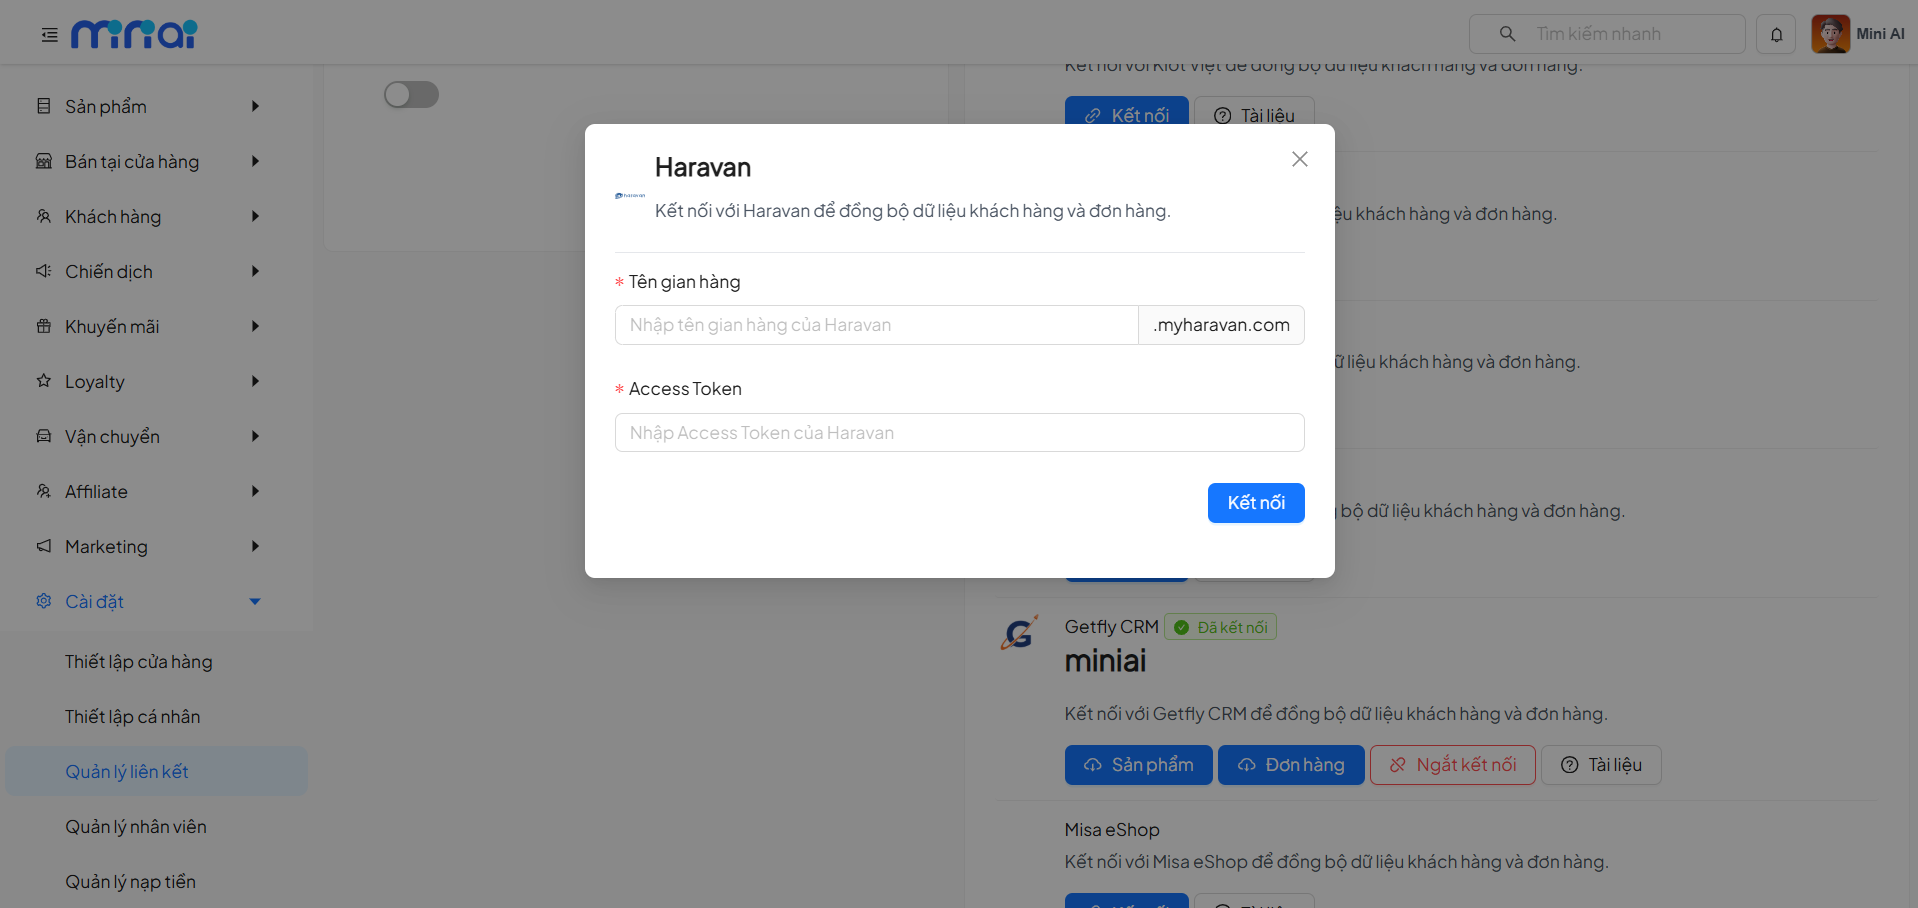
Step 3: Enter Haravan Connection Information
The system will display a configuration popup. Users need to fill in:
- Store Name (The Haravan store subdomain, e.g.: store-name.myharavan.com)
- Haravan Access Token
To get the Haravan Access Token, follow these steps:
- Log in to the Haravan admin dashboard
- Go to Applications → Application Management
- Create a custom application
- Grant Read & Write permissions for:
- Products
- Orders
- Customers Complete the application creation, the system will issue an Access Token
Copy the Token and paste it into the system
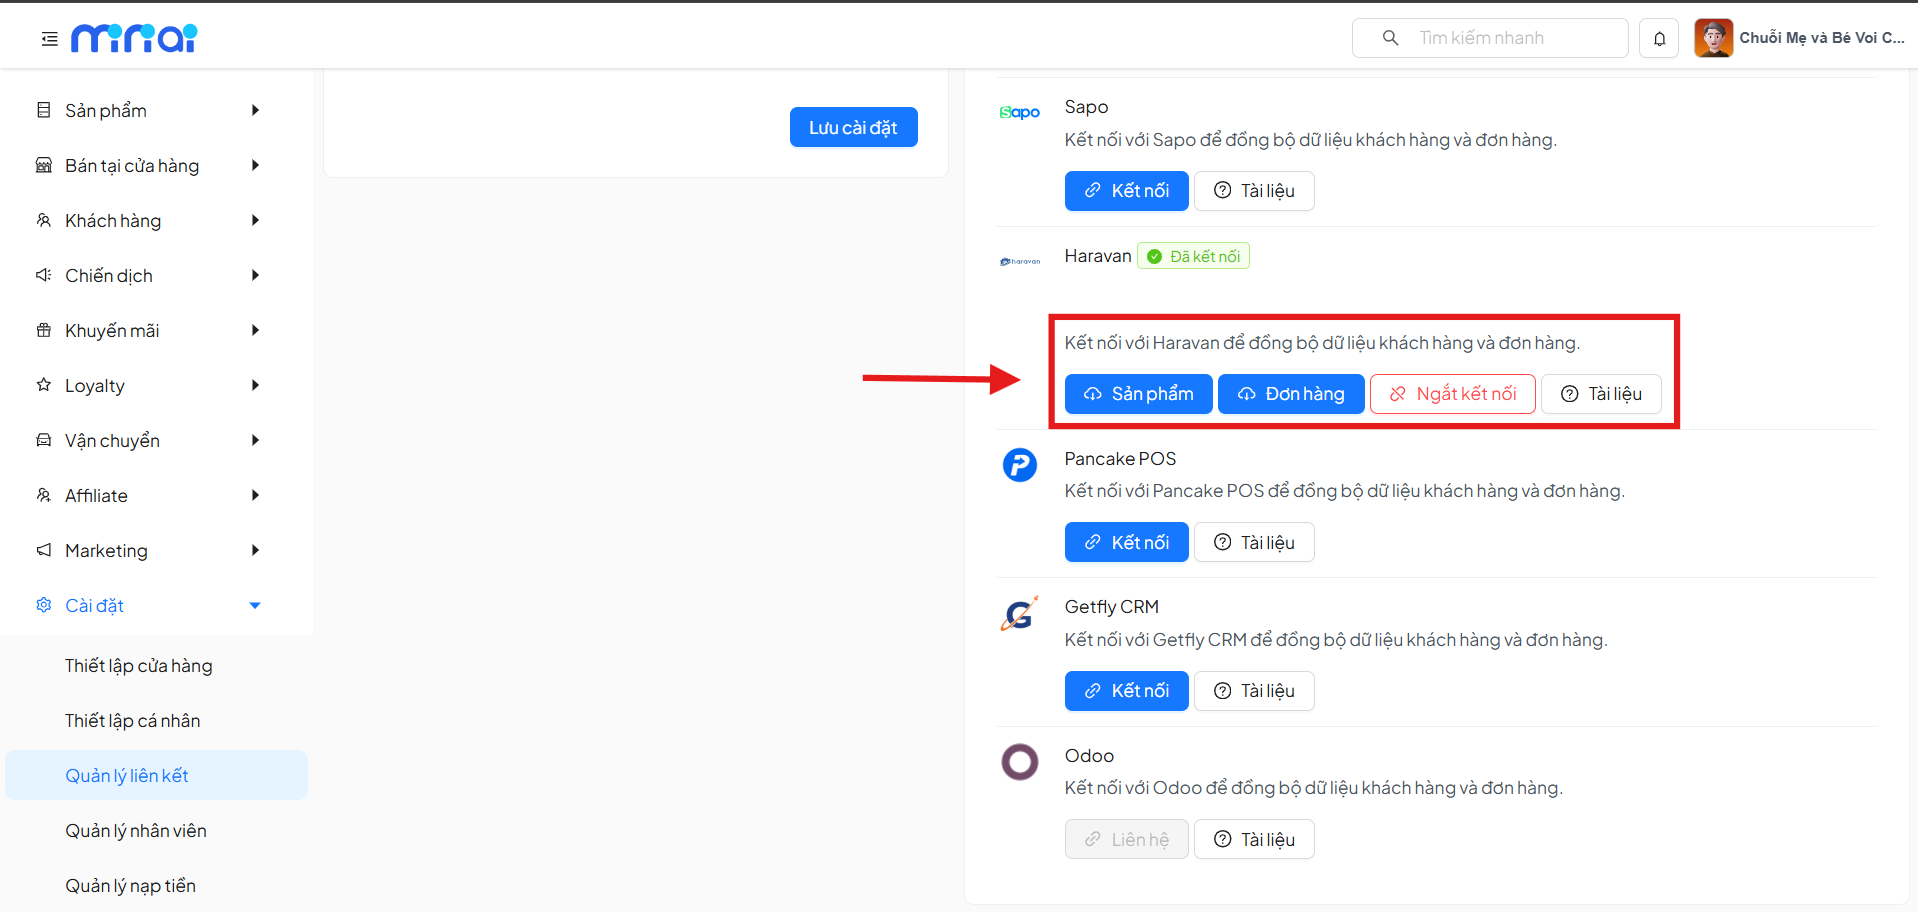
Step 4: Confirm Successful Connection
After a successful connection, users can select the data to synchronize from Haravan, including:
- Orders
- Products
- Customers
Click on each corresponding item to begin the data synchronization process.
If no longer needed:
- Users can click Disconnect
- The system will stop all data synchronization from Haravan
- Previously synchronized data will remain safely stored on the system
5. Linking with Pancake POS
The Pancake POS integration feature allows the system to automatically synchronize product, customer, and order data from Pancake POS to the sales management platform, helping businesses manage centrally, track orders accurately, and optimize multi-channel operations.
Before performing the integration, users need to ensure:
- Have an active Pancake POS account
- Have API / Webhook access on Pancake POS
- Have reviewed the permission documentation and integration guide (attached directly within the feature)
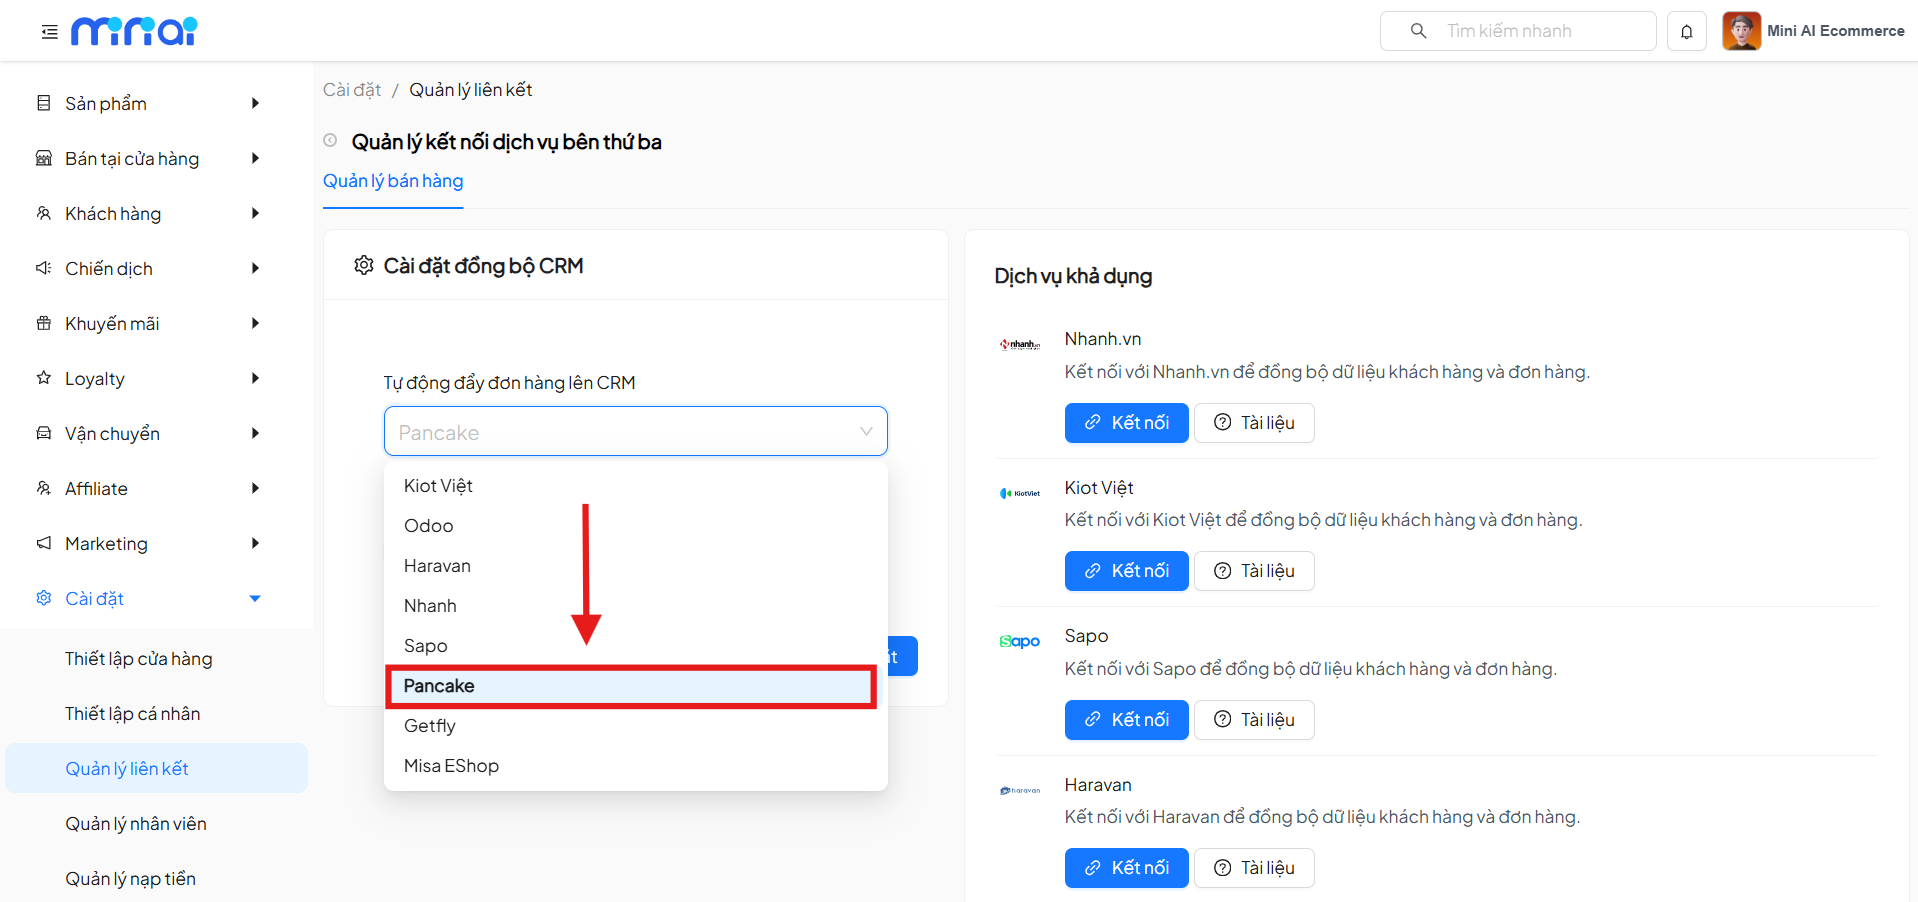
Step 1: Select Integration Channel
On the Link Management page, select the integration channel as Pancake POS to begin the configuration process.
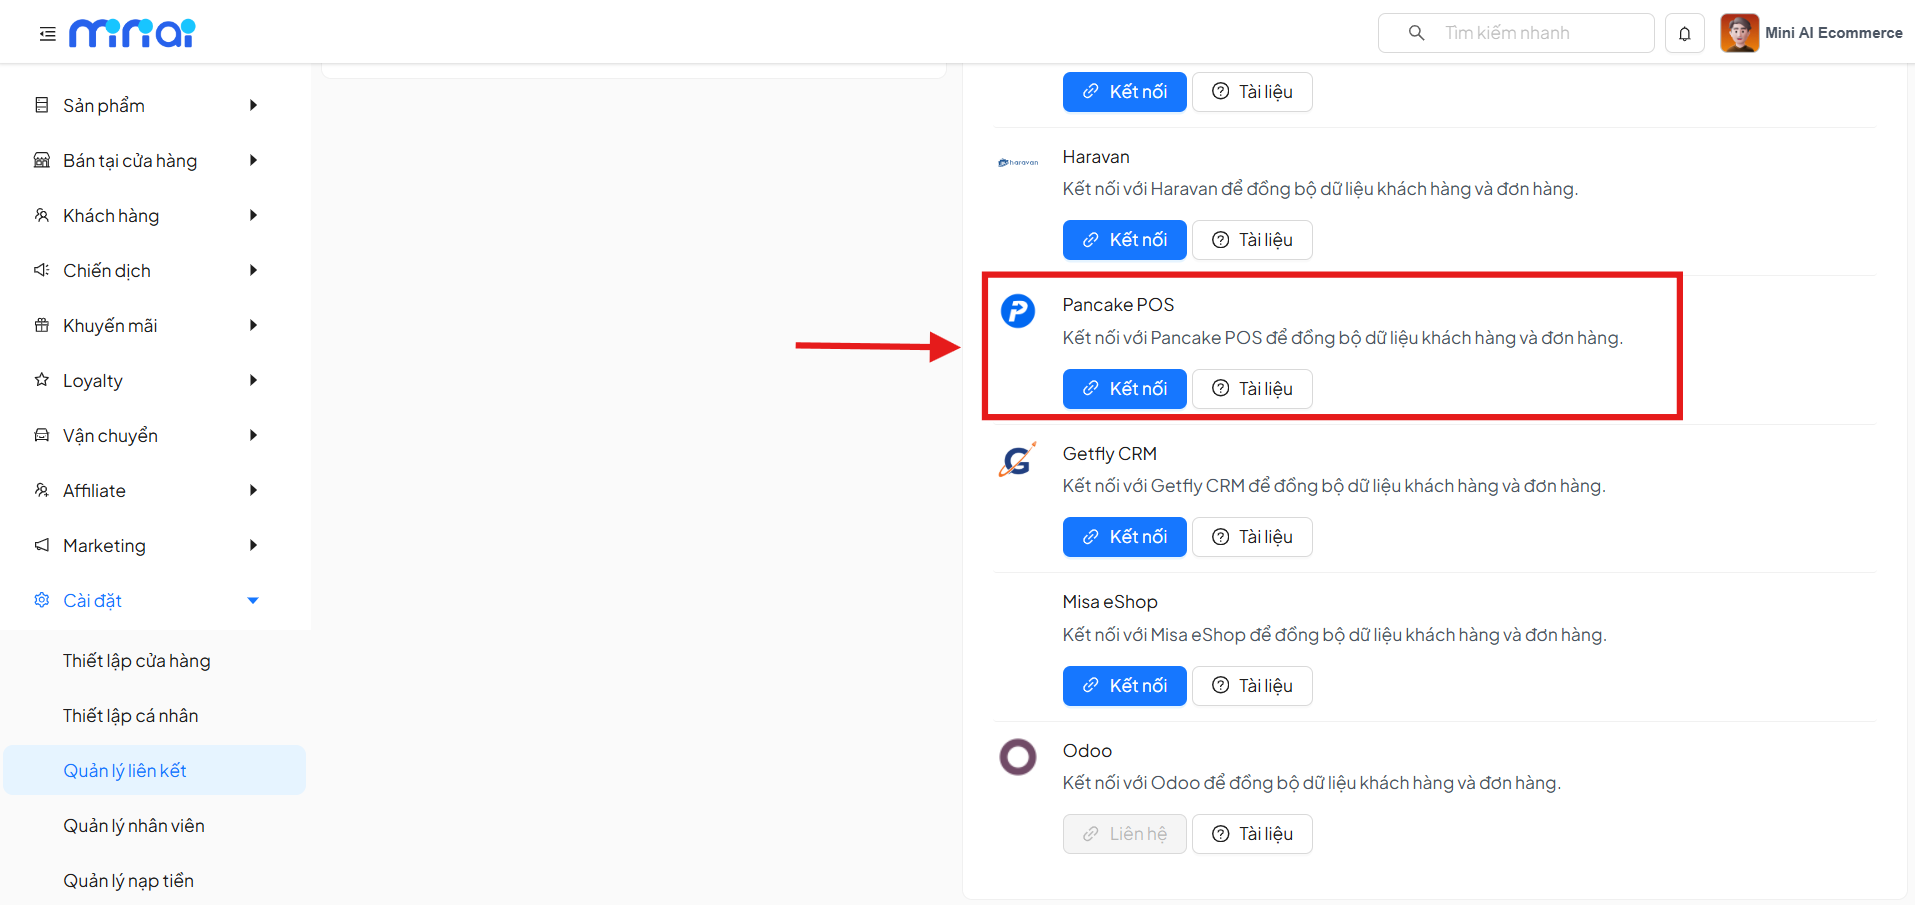
Step 2: Select Available Service
In the Available Services section, select Connect with Pancake POS to continue the integration setup.
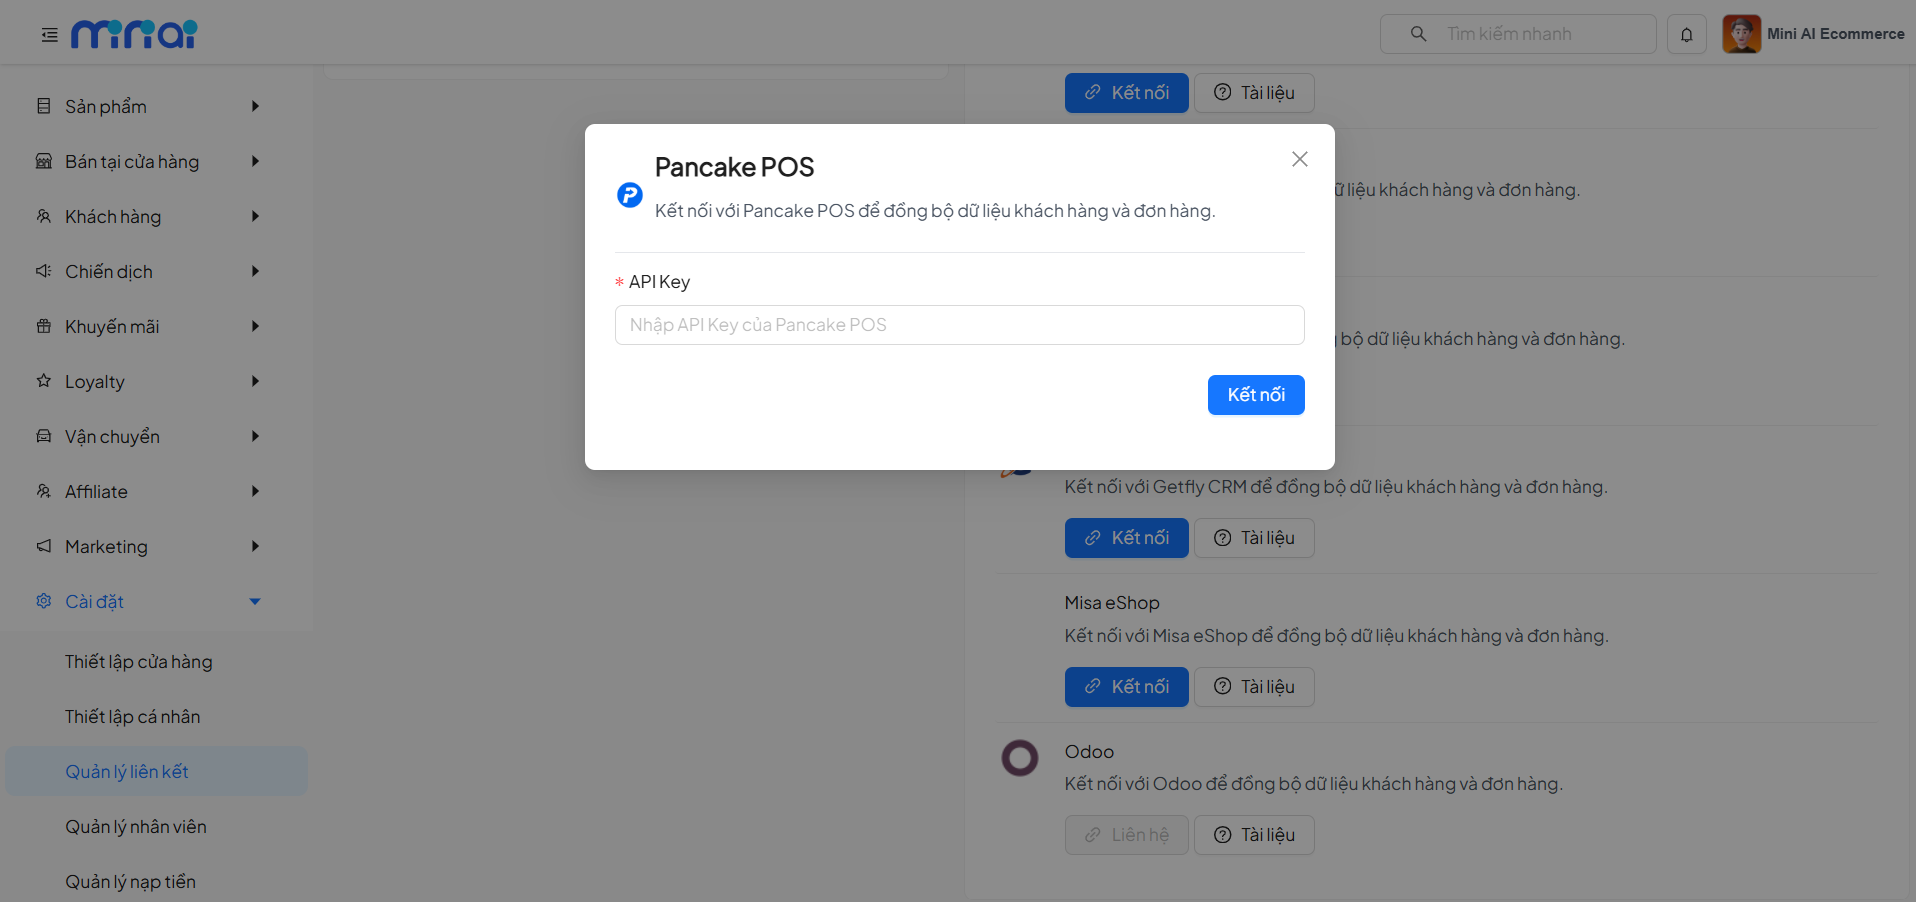
Step 3: Enter Pancake POS Connection Information
The system displays a configuration popup. Users need to:
- Enter the Pancake POS API Key
- Click Connect to authenticate the initial connection
Entering the API Key does not complete the entire connection. Users need to continue configuring the Webhook on the Pancake POS side.
Step 4: Configure Webhook on Pancake POS (Required)
Users configure directly on Pancake POS following these steps:
1. Access Webhook Configuration
- Log in to Pancake POS
- Repeat the steps to get the API Key
- At the Webhook / API step, open the Webhook configuration screen
2. Configure Webhook Information
On the Webhook configuration screen, fill in the following information:
- Enable Webhook URL connection
- Address (Webhook URL)
https://data-sync.api.miniap.vn/webhooks/pancakepos
This is the data interaction gateway between MiniAI and Pancake POS
3. Configure Request Header
Add the following fields to the Request Header section:
- Key: `x-store-id`
- Value: `<Store ID>` - (Store ID on Pancake POS, can be found in the URL)
This ID is the store identifier in the Pancake POS system, used to determine the data source during synchronization.
4. Save Configuration
- After entering all information, click Save
- Complete the Webhook configuration and Pancake POS connection
Step 5: Confirm Successful Connection
After a successful connection, users can select the data to synchronize from Pancake POS, including:
- Orders
- Products
- Customers
Click on each corresponding item to begin the data synchronization process.

If no longer needed:
- Users can click Disconnect
- The system will stop all data synchronization from Pancake POS
- Previously synchronized data will remain safely stored on the system
7. Linking with Odoo
Since Odoo is an open-source platform with many versions and configurations, to ensure a smooth integration process, please contact the MiniAI technical support team for discussion and detailed assistance.
When communicating with the support team, please provide complete information about the Odoo version you are using, installed modules, and specific data synchronization requirements. This will help the technical team better understand your environment and provide the most suitable solution. Note that the setup process may require admin access to the Odoo system.
Thank you for your cooperation!
7. Linking with Getfly CRM
The integration setup guide for Getfly CRM will be updated soon.
8. Linking with Misa Eshop
The integration setup guide for Misa Eshop will be updated soon.